Here it is described how to install OpenWRT to a Linksys WRT1200AC. Other routers should be similar . A few basic features like printserver, DoH and mDNS are listed here.
Configuration of the upstream router
The upstream router in this case is a CH7466CE and it must be set to bridge mode via the "MeinVodafone" login under this link: . This is needed to enable prefix delegation in IPv6. Please note that wifi is disabled then.
Factory install
From a running openwrt it is possible to overwrite the alternative flash partition (mtd5 <-> mtd7) with a openwrt factory image where flash memory space is reclaimed but all configuration is lost. First get a factory image from the openwrt site:
cd /tmp
wget https://downloads.openwrt.org/releases/22.03.2/targets/mvebu/cortexa9/openwrt-22.03.2-mvebu-cortexa9-linksys_wrt1200ac-squashfs-factory.img
The install the image forceably:
sysupgrade -F -n -v openwrt-22.03.2-mvebu-cortexa9-linksys_wrt1200ac-squashfs-factory.imgSysupgrade
New image upgrad see here:https://openwrt.org/docs/guide-user/installation/generic.sysupgrade
Boot between 2 alternate partitions
The WRT1200AC has two dedicated partitions which each can be flashed by two different firmwares. It is possible to permanently select the partition to boot at startup.
Check, on which partition you are: dmesg | grep mtd
- If mtd5 is attached to ubi0, you are on first partition.
- If mtd7 is attached to ubi0, you are on second partition.
Reboot into particular partition:
fw_setenv boot_part 1 && rebootfor booting into first partitionfw_setenv boot_part 2 && rebootfor booting into second partition
Add ssh key
To gain password less root access to the fresh booted openwrt:
ssh-copy-id root@openwrt.lanBackup and Restore
In case of a reinstallation on to a another router, configuration and user installed packages should be preserved.
Backup
User installed packages
Create a list of user installed packages by shell script like ./user-installed.sh:
#!/bin/sh
FLASH_TIME="$(awk '
$1 == "Installed-Time:" && ($2 < OLDEST || OLDEST=="") {
  OLDEST=$2
}
END {
  print OLDEST
}
' /usr/lib/opkg/status)"

awk -v FT="$FLASH_TIME" '
$1 == "Package:" {
  PKG=$2
  USR=""
}
$1 == "Status:" && $3 ~ "user" {
  USR=1
}
$1 == "Installed-Time:" && USR && $2 != FT {
  print PKG
}
' /usr/lib/opkg/status | sort
Make it executable by chmod a+x ./user-installed.sh and create a list in /etc/backup/installed_packages.txt:
root@OpenWrt:~# mkdir /etc/backup
root@OpenWrt:~# ./user-installed.sh > /etc/backup/installed_packages.txt
List of user installed packages
luci-app-advanced-reboot luci-app-ddns drill? curl luci-app-p910nd kmod-usb-printer umdns kmod-usb-storage
Configuration
To save the single configurations from the /etc directory, go to Luci System -> Backup/Flash Firmware Tab Configuration and insert the paths like /etc/docker, /etc/backup, or /etc/sudoers in the text window. Press Save and now the backup can be started in Tab Actions with Backup->GENERATE ARCHIVE. The resulting tar.gz file could be downloaded to the local PC for backup reasons.
CLI: The entries can also be added to the file /etc/sysupgrade.conf and a backup can be stored:
# Verify backup configuration
sysupgrade -l

umask go=
sysupgrade -b /tmp/backup-${HOSTNAME}-$(date +%F).tar.gz
ls /tmp/backup-*.tar.gz
Upload the file from a network connect PC:
scp root@openwrt.lan:/tmp/backup-*.tar.gz .Restore
Firt install the user installed packages from the old system and then restore the configuration.
User installed packages
When restoring the formerly saved backup via Luci by System -> Backup/Flash Firmware Tab Actions with Restore->UPLOAD ARCHIVE and selected tar.gz file from your PC, the missing needed packages could be reinstalled:
opkg update && for i in `cat /etc/backup/installed_packages.txt`; do opkg install $i; doneConfiguration
Download from the PC to the network connected openwrt router:
scp backup-*.tar.gz root@openwrt.lan:/tmpRestore from backup:
ls /tmp/backup-*.tar.gz
sysupgrade -r /tmp/backup-*.tar.gz
reboot
DoH
To establish DNS over HTTPS, install neede packets and configure via Luci:
root@OpenWrt:~# opkg update
root@OpenWrt:~# opkg install https-dns-proxy luci-app-https-dns-proxy
mDNS
To advertise services and hostname with suffix .local to the local network, install umdns:
root@OpenWrt:~# opkg update
root@OpenWrt:~# opkg install umdns
Print server
Install the kernel module, the p910nd server and the luci app:
root@OpenWrt:~# opkg update
root@OpenWrt:~# opkg install kmod-usb-printer p910nd luci-app-p910nd
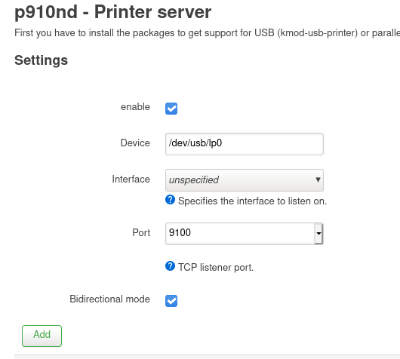
In luci navigate to Services → p910nd - Printer server and do some settings:

After enabling press Save and Apply to start service. On another PC, CUPS must be configured to work with the service.